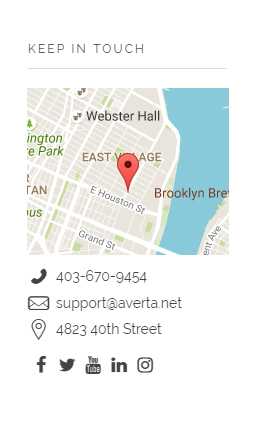
 Phlox has a?Contact Box Widget which allows you to write your contact information, such as phone number, social media, and address. You can add this widget on any available widget area, or between the content of your posts or pages.
Follow below steps to add Phlox Contact Box to a widget area or in a page content:
- Go to your WordPress admin panel
- Click?Appearance on the Dashboard
- Then click on Widgets
- Find [Phlox] Contact Box?among the available widgets and add it to your desired Widget Area
Video Tutorial
Access Contact Box Options in Elementor Page Builder
- Go to your WordPress Admin Panel
- Click the Pages?on the Dashboard
- Click the Add New
- Navigate to the top left hand of the WordPress text-box and find?Edit with Elementor?button.
- Check out?Elements
- Scroll down to?PHLOX – GENERAL?section
- Choose?Contact Box
 After you add contact box to your post or page, you are able to customize it by available options:
Contact Info
You can set the Email?address of website author here. You are able to add?Telephone number or?Show site socials. Also, write an Address to show on the contact box if you want. Please note that all of these options are optional.
Map
Enable?Show map?to have a map on your contact box.?There are to options on?Map position?that let you show your map?Below?or Above?the contact details.
You can change?Map height?on desktop, tablet, and mobile.
To show your place on the map, you need to put Longitude and Latitude. In order to find out a place?s latitude/longitude, right click the place or area on google maps and select What?s here. Then you will find a coordinates box at the bottom of the page.
There are two?Map types.?Roadmap?and?Satellite. After choosing each of them, you are able to find many preset styles on this website?and copy the style on?Map style section.
If you want to popup a text after marker is clicked, you can add the text as a?Marker info.
To add navigations such as zoom in, zoom out, fullscreen view button, etc. to your map, you need to enable?Navigation control.
You can set the default and initial resolution by changing?Zoom?from 1 to 20. Also, you can?enable?Zoom with mouse wheel?in order to let your visitors change it by mouse wheel.
Recommended: Check out this article to know more about Advanced tab and start working with Elementor.
Access Contact Box Options in SiteOrigin Page Builder
- Go to your WordPress Admin Panel
- Click?Pages?on the Dashboard
- Click?Add New
- Navigate to the top right hand of the WordPress editor and find Page Builder, beside text tab
- Click?Add Widget
- Click Phlox?and choose?[Phlox]?Contact Box
- Click?Edit?on the right side of the widget on?Page Builder?
After you add contact box to your post or page, you are able to customize it by available options:

Title
In this field, you can enter a title for the widget.
Write your email address here and it appears under the phone number.
Telephone
The telephone number will be displayed at the top of the box, under the title. (If you enable the map, the telephone will be below it.)
Address
In this section, you can write your address. It shows up below the email address.
Recommended: You can switch on the Show socials to show your social media on contact box. But it shows the enabled socials. You can find more info about enabling socials here.
Map
By enabling Show map, a map will be added at the top of the widget.
Recommended: You can find more info about map options here.
Extra Class Name
In this section, you can customize the widget. Write your desired style on your CSS file and add the defined class name here.
